Home Assistant OS + Frigate Storage on Proxmox
Introduction
A new topic for the blog is Home Automation, in this case with Home Assistant, but it doesn’t diverge from the core philosophies of privacy, security and open source software.
This post is a pretty specific, but hopefully fairly common scenario, and written mostly as a write up for a fellow Home Assistant OS (HAOS) user looking to replicate a similar setup to mine.
Background
Home Assistant OS is one of the “Virtual Appliance” forms of Home Assistant; this means it’s easy to set up an identical copy of Home Assistant in a consistent and manageable way, but, it also means that anything slightly out of the ordinary can be more complex to setup.
Frigate is a third-party home security system which can be integrated into Home Assistant, and provides local hardware-accelerated machine learning features to your video feeds.
While these two systems integrate nicely 99% of the time, there is one pretty glaring issue when it comes to Frigate in HAOS; The HAOS image has a fixed size, and Frigate’s entire purpose is to record and process video, lots of it.
Soon after getting started, people like myself will find they need additional storage, and with HAOS, unfortunately, it is not as simple as adding an external drive and pointing Frigate at it.
Why so complicated?
Without getting into too much detail, there are a couple of reasons that mounting additional storage to HAOS is a little more complicated than one might expect.
First, HAOS, being an “Virtual Appliance” is a lean, purpose-built Linux distribution containing only the tools required; unlike a regular Linux distribution, it was not designed to be interacted with from the command line; the primary user interface is the web-based application interface.
The second reason for additional complexity is that HAOS is a containerised distribution; that is to say, the parts of HAOS, the core, the addons, any additional software added to it, run in containers, currently Docker based. This is great for security and modularity, but means extra steps are required to share filesystems and devices with the software running inside containers.
Prerequisites
There are some steps I don’t intend to cover here, which should be in place before getting started, assumptions I’ll be making here;
- You are using Proxmox to run the VM
- You are using the HAOS Virtual Appliance (.qcow2 KVM image) and have it up and running.
- Frigate is installed in the HAOS VM and is running as expected.
- You have SSH access to the VM. It is important that this is access to the base VM and not sandboxed in a container like the official SSH add-on would do.
SSH
SSH access to the base VM is critical, because in order to gain the privileges and access needed to mount additional storage relies on us having access to the main OS. There are a couple of ways to do this, but the official “developer/debug” method is probably the most likely to succeed now and in the future.
Additional Storage
In my case, I added a separate, physical drive (SATA SSD) to my Proxmox machine specifically for Frigate video storage.
Proxmox Configuration
The first step is to make Proxmox aware of the new drive; this isn’t the only way to achieve this but it’s a solution that allows me to easily move things around later if needed. Using a virtual-disk image on the SSD means it can be resized, and can be moved to another machine or another drive should my requirements change.
Once the disk (pardon the misnomer, Proxmox uses the term “Disk”) is added to your machine and is visible in the Disks tab, a new storage type can be created.
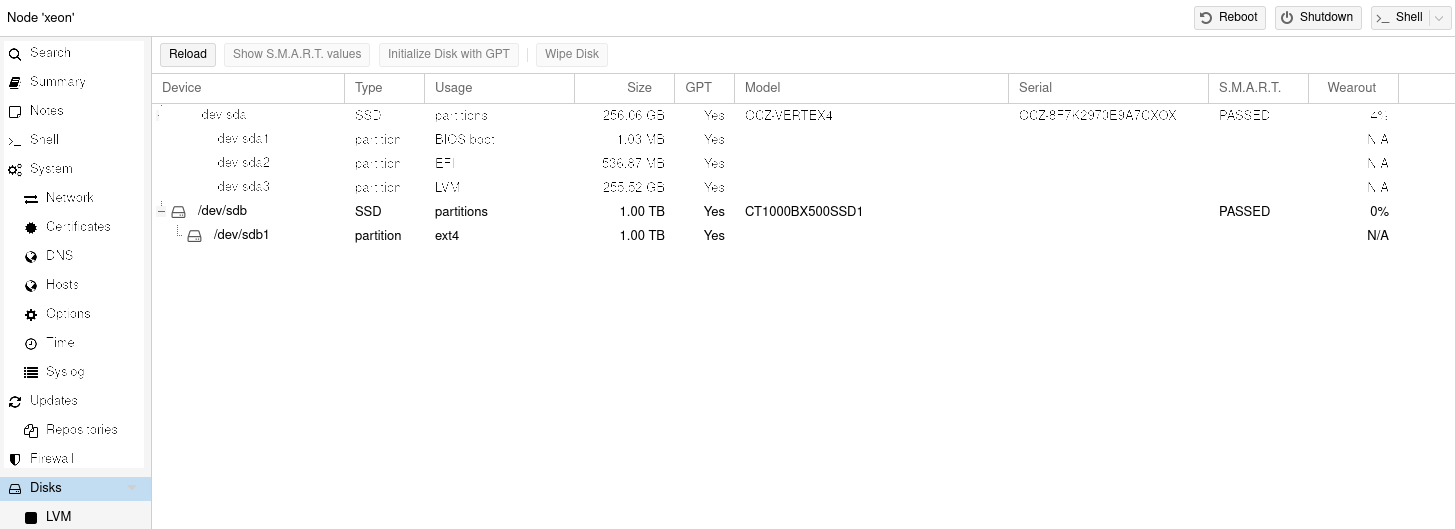
NOTE: My server is called “xeon”, because it runs on a Xeon processor shrug.
Create a new “Directory” storage type, using the drive mentioned in the Disks tab, and mount it somewhere, it doesn’t matter where, so choose a name that’s going to help remember what it is for in the future.

Next, we can create a VM disk image in the new Directory storage pool. I created a disk that fills almost the entirety of the drive, but size this as you see fit.

Finally, for the Proxmox configuration, we can add the new disk to our HAOS VM.
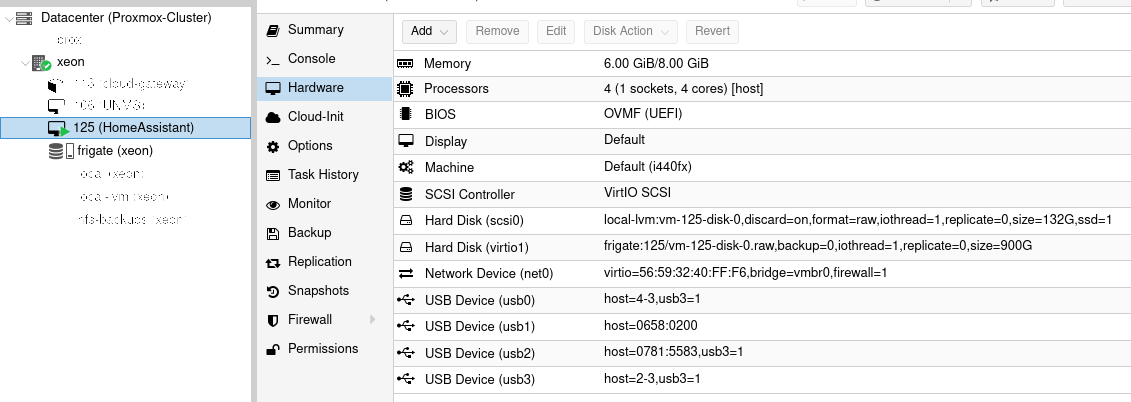
NOTE: It may be apparent from the image above that I have a few USB devices mounted to the VM. I am using the “Coral USB Edge TPU” for Frigate, I am also mounting my Z-Wave stick. The further mounts cover the remaining USB controllers on this small server which is serving only the purpose of hosting Home Assistant.
Mounting in HAOS
Normally, in Linux, we’d mount drives using mount and using /etc/fstab to persist the mount so it occurs at each boot. In the case of HAOS, the / mount point, and thus /etc/ directory and some of the things in it, are mounted read-only. What this means, in practice, is that although we have access to the mount command, when we SSH in, and we’re running as root, so we have the privileges to mount a drive, we cannot persist the mount because we’re unable to edit the /etc/fstab file.
UDEV to the Rescue
UDEV allows us to perform device actions based on events in Linux. In this case, when a new device has the correct name as defined by the UDEV rule, some steps are performed to mount it, and subsequently unmount it when necessary.
Thanks to this Github Gist we have the rule syntax needed to perform the mount. Though I prefer the shorter, ~4 line rule file some way down the comments.
There are a few other steps we need to perform first however, before we write this rule, so let’s go through those;
Partition
In Linux, drives usually need to be partitioned and formatted with a filesystem before we write to them, let’s do that for our new drive. First, we run fdisk -l to find the drive we’re looking for.
NOTE: I’ll aim to use code blocks and not images in this section to aid those with screen-readers and/or copy-pasting. Code blocks will include the output of each command to show the expected result, so don’t copy the entire block.
# fdisk -l
Disk /dev/vda: 900 GiB, 966367641600 bytes, 1887436800 sectors
Units: sectors of 1 * 512 = 512 bytes
Sector size (logical/physical): 512 bytes / 512 bytes
I/O size (minimum/optimal): 512 bytes / 512 bytes
Disklabel type: dos
Disk identifier: 0x1c5175d1

Device     Boot Start        End    Sectors  Size Id Type
/dev/vda1        2048 1887436799 1887434752  900G 83 Linux
...
The output will contain a number of drives, some ram disks, and the primary host drive with a bunch of partitions on it, the best way to figure out which drive you need is to look at the size and find the one that matches what you expect. It may not be exactly the same number you’re expecting due to differences in size calculations, but 900G is closer to 1T than 132G is, so it’s most likely the former.
The naming convention the drive follows really depends on the type of drive, or rather, the way in which the drive connects to the system, SATA, NVM.e, SCSI, etc all have their own naming systems to help identify them. In my case, I used the VirtIO controller type, giving the drive the vdX moniker. The last letter, changes for each drive of the same type, so multiple VirtIO disks could be vda, vdb, vdc etc.
Now we have the drive we want, we can partition and format it (unfortunately I can’t show the exact output here as my drive is already partitioned and formatted):
NOTE: Be sure to replace <device name> below with your device name as discovered above;
fdisk /dev/<device name>

# fdisk /dev/vda

Welcome to fdisk (util-linux 2.37.4).
Changes will remain in memory only, until you decide to write them.
Be careful before using the write command.

Command (m for help):
Enter the command n to create a new partition, it should be a primary partition, number 1 and use the default start and end (just press enter) which should use the full disk size by default.
Once done, enter w to write the partitions to disk; nothing will be actioned on the disk until the write operation is issued.
Now the drive will have a partition number 1, so if the drive was vda, the partition should be vda1.
Filesystem
Next we need to format the partition with a filesystem. We’ll use ext4 which is the current favourite for features and compatibility.
TIP: Be sure to set the path to the name of the partition we created above in fdisk. In the case of the example above, it would be vdb1 making the full command mkfs.ext4 /dev/vdb1.
mkfs.ext4 /dev/<partition>
Partition UUID
Next we need to grab the UUID of the partition we created above. The reason we use the UUID rather than the device name or partition name is that the UUID doesn’t change, but adding or removing drives from the machine could rename or reorder existing drive letters, which will break things for us!
There are a bunch of ways to grab the UUID for the partition, my favourite is blkid, but one could also use lsblk -f, the important part is to be clear which drive you’re looking for. In our case it’s the parition we created above and just used to make the filesystem. In the case of my example above vda1.
blkid | grep vda1
/dev/vda1: UUID="be5da11f-6a49-4f7e-8496-0e47e745d941" BLOCK_SIZE="4096" TYPE="ext4" PARTUUID="1c5175d1-01"
Because we used grep to select the correct drive in the output, there should only be a single line. If there is no output, try running blkid alone without the grep portion.
UDEV Rule
I’m going to reproduce the UDEV rule here in case those links above go bad, I’ll select the shorter rule from the comments;
KERNEL!="vdb[0-9]", GOTO="abort_rule"

ACTION=="add", RUN{program}+="/usr/bin/mkdir -p /mnt/data/supervisor/media/frigate", RUN{program}+="/usr/bin/systemd-mount --no-block --automount=no --collect /dev/disk/by-uuid/<your UUID goes here>	/mnt/data/supervisor/media/frigate"
ACTION=="remove", RUN{program}+="/usr/bin/systemd-umount /mnt/data/supervisor/media/frigate", RUN{program}+="/usr/bin/rmdir /mnt/data/supervisor/media/frigate"

LABEL="abort_rule"
While SSHd into the HAOS VM, place the lines above into a file located at /etc/udev/rules.d/80-mount-additional-storage.rules.
Replace the <your UUID goes here> with the UUID we grabbed from above, don’t include the quotes if it has any.
There are unlikely to be many text editors installed in the VM so you may have to use
vi.
To enter editing/writing mode, known as insert mode in
vi, pressi.
To write and exit in
vipressESCthen:wq<enter>, that’s type: colon, w, q, <enter>
I prefer
vim, for the record.
Finally, we should reload the UDEV rules so that the new rule is active;
udevadm control --reload-rules
Reboot.
Check everything worked
# df -h | grep vda1
/dev/vda1               884.8G    451.7M    839.3G   0% /mnt/data/supervisor/media/frigate
The df command shows us filesystem usage, but it also tells us where certain drives are mounted. As we can see above, /dev/vda1 is mounted to /mnt/data/supervisor/media/frigate.
That’s it we’re done. Frigate should now be writing its recording to the new drive.